The end of support for Windows 10 on 14 October 2025 has (hopefully) prompted many companies to migrate to Windows 11. In this context, it would also make sense to switch the device management to Microsoft Intune and manage the Windows 11 hardening policies there as well. With a properly configured hardening baseline, the attack surface of Windows systems can be significantly reduced.
With Intune, policies can be easily created and distributed centrally. Nevertheless, there are a few things to keep in mind. In this article, you will learn how to securely harden Windows 11 – with specific recommendations on various topics related to the Windows 11 hardening:
- Microsoft Security Baseline
- CIS Benchmarks
- BitLocker via Intune
- Recovery keys
- LAPS (Local Admin Password Solution)
- ASR (Attack Surface Reduction) rules
- Windows firewall
In the end, you will have formed your own opinion and know how to proceed in order to secure Windows 11 devices accordingly.
Table of contents
- Simple and Fast: Microsoft Security Baselines
- Applying CIS Benchmark to Windows 11
- Managing BitLocker via Intune
- LAPS (Local Admin Password Solution) for Secure Management of Local Administrator Accounts
- Attack Surface Reduction (ASR)
- Using the Windows Firewall Effectively
- Conclusion: Greater IT Security With Windows 11 Hardening
Simple and Fast: Microsoft Security Baselines
Microsoft has been providing security baselines for its products for years. As part of the Microsoft Security Compliance Toolkit for Windows 10, it was possible to download corresponding policies and import them into the Active Directory (AD) as Group Policy Objects (GPOs). Appropriate baselines are also available for Windows Server, Windows Defender, the Edge browser, and Office applications. However, the process is much easier with Intune.
Creating Microsoft Security Baselines in Intune
In Intune, security baselines no longer need to be downloaded or imported separately. Microsoft provides the policies directly under “Endpoint security > Security baselines”, so they can be easily created, customized, and distributed to devices.
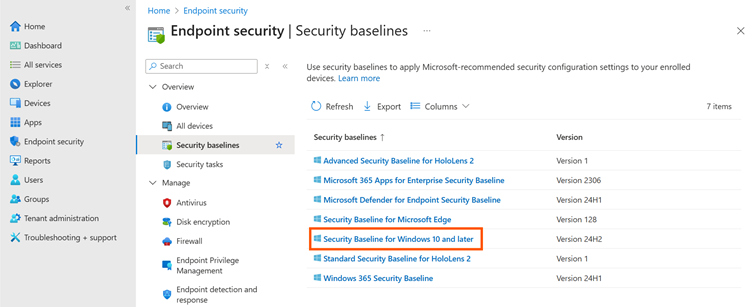
By selecting the menu item “Security Baseline for Windows 10 and later” marked in the image above, a new Microsoft Security Baseline for Windows 11 can be created using the “Create Policy” button. Firstly, a meaningful name must be assigned. Afterwards, the settings already specified by the policy can be checked. Finally, an assignment is made – first for a few test devices and, once everything is OK, for all devices. Assignments should only be given to computer groups in order to avoid disruptions, for example if different users log in to one device.
Since the security baseline that has just been created contains a large number of settings, it should first be thoroughly tested before being applied to a productive environment. During hardening, it is completely normal for individual functions to no longer work as expected. In such cases, the root causes must be analyzed and appropriate adjustments made. In addition, conflicts with existing configuration policies may occur. Typically, the relevant settings within the security baseline are then adjusted – either by changing the respective value or by completely removing the relevant policy from the baseline.
Depending on the situation, analyzing errors and identifying problematic settings can be challenging, especially if error messages or log entries do not clearly indicate the actual cause. Experienced employees familiar with the technologies, protocols, and processes used in the company provide valuable support here and can significantly speed up troubleshooting.
Implementing and Managing Windows Security Baselines Successfully
For an effective Windows 11 hardening, Windows Security Baselines must be properly integrated and maintained. Two aspects are particularly important in this context:
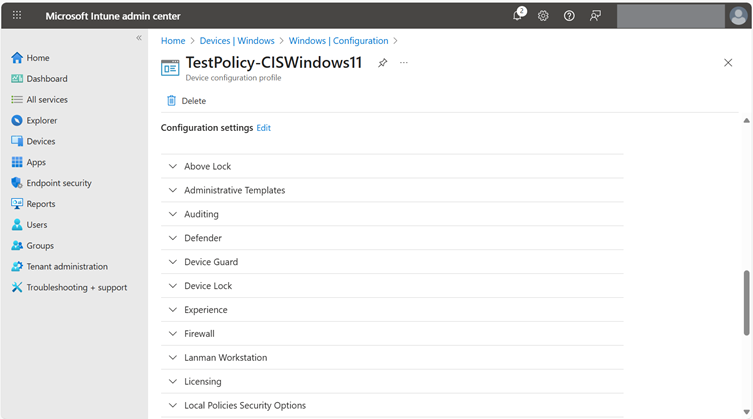
The baselines are treated internally as configuration policies, which are created and managed in a separate menu in Intune but still listed under “Devices -> Windows -> Configuration” along with all other configuration policies. As the seasoned Intune admin knows, configuration policies are organized in a flat hierarchy and settings can neither be inherited nor exist twice with different values. It is therefore quite possible that the security baseline policy created contains settings that have already been set in other configuration policies.
In short: There may be conflicts that need to be resolved. If a conflict is detected, it will be displayed either in Intune on the device to which the policy is applied or for the policy itself in the report – including the corresponding settings and the name of the policy that configures the same setting. It is advisable to identify the relevant settings and remove them from the security baseline. All changes to the baseline should be thoroughly documented, including the reason for the change, so that it is clear in the future what has been changed and why. This is important because Microsoft occasionally releases new versions of the security baselines and provides updates.
Intune itself does not track changes to policies, and the flat hierarchy means that there is no possibility of “exception policies” or similar mechanisms. The relevant policies are marked with an arrow in the web GUI and the version of each policy is visible in the overview.

When updating a policy, all changes that have been made must be re-entered. Well-maintained documentation is helpful here as it allows the security baseline update to be implemented quickly. Microsoft provides information about new policy versions in the Message Center (found in the admin portal) or in the context of a blog post in the Microsoft Community Hub, where posts can also be subscribed to as RSS feeds. For Windows, a new baseline is usually released once a year after the release of the new version (e.g., 25H2).
This should now have created a fundamental security basis that can be used to increase the security level in the Windows 11 environment when applied to client systems.
Applying CIS Benchmark to Windows 11
Implementing the CIS (Center for Internet Security) recommendations for Windows 11 takes it one step further. For devices managed with Intune, the CIS issues a separate benchmark for Windows 11: CIS_Microsoft_Intune_for_Windows_11_Benchmark.
It recommends hundreds of settings, including brief explanations of what they do and why they are important. There are two levels for classifying the effects of the recommended settings on productive operations:
- Level 1 = low risk of negative effects
- Level 2 = possible negative effects are to be expected
Although the Windows Security Baselines overlap with the CIS Benchmarks in many aspects, they are more streamlined and cover fewer settings than the CIS recommendations.
Experience has shown that the following measures are important during implementation:
- Combining all level 1 recommendations into one policy and testing it
- Reviewing level 2 recommendations with the relevant teams/employees and deciding for each setting whether it is relevant, whether negative effects are to be expected, and whether the recommendation should be implemented
- Documentation of settings that were not implemented (with justification)
- Documentation of settings that deviate from the CIS recommendation or have already been set in other configuration policies (keyword: conflicts)
Some settings cannot be configured using the settings catalog but must be configured using PowerShell or another method. I recommend looking at similar issues and solving them by applying the same principle. One option, for example, would be to use the remediation and platform scripts in Intune, however, these are not included in every license (e.g., Business Premium).
If the Windows Security Baseline has already been implemented, collisions will of course play a role here as well, which must be identified and resolved during initial testing of the new policy in Intune. My preferred approach is to remove (and document) the relevant settings in the Windows Security Baseline and retain the settings from the CIS benchmark. This means that, at least in theory, the following structure can be assumed: the Microsoft Security Baseline forms the foundation and the CIS recommendations built on it. Of course, the CIS Benchmark recommendations can also be implemented without the Microsoft Security Baseline. However, in my personal opinion they complement each other very well.
Following implementation and testing, a security baseline for Windows 11 clients should now be in place that can be distributed via Intune. However, the various security-related settings are only one part of a solid foundation. Other components are missing such as BitLocker for drive encryption or a suitable firewall policy. Both are described in basic terms in the CIS Benchmark but are not covered in detail. To close this gap, the next chapter will focus on BitLocker and its management via Intune.
Managing BitLocker via Intune
BitLocker is the tool of choice when it comes to encrypting data (more specifically, partitions on local hard drives and removable media) locally. Intune makes it easy for companies to activate BitLocker on their devices.
However, it is also criticized that it is not possible to natively set a PIN during automatic encryption when setting up a device with Autopilot or Device Preparation (two methods for automated device enrollment via Intune) – but more on that later.
Creating and Configuring a BitLocker Policy
A corresponding policy can be created in Intune under “Endpoint security -> Disk encryption”. First of all, a meaningful name must be assigned. Afterwards, the portal will display all relevant settings for BitLocker.
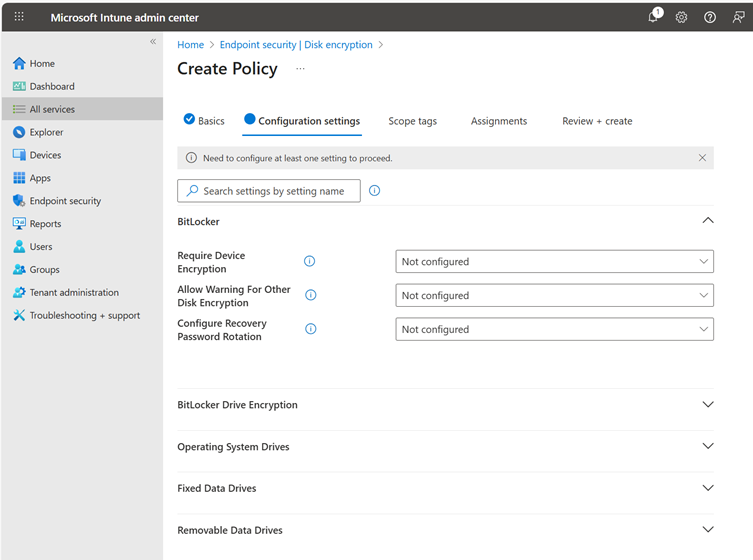
The following values are recommended for automatic encryption during device setup with Autopilot or Device Preparation:
| Name | Value |
| BitLocker | – |
| Require Device Encryption | Enabled |
| Allow Warning For Other Disk Encryption | Disabled |
| Allow Standard User Encryption | Enabled |
| BitLocker Drive Encryption | – |
| Choose drive encryption method and cipher strength (Windows 10 [Version 1511] and later) | Enabled |
| Select the encryption method for fixed data drives: | XTS-AES 256-bit |
| Select the encryption method for operating system drives: | XTS-AES 256-bit |
| Select the encryption method for removable data drives: | XTS-AES 256-bit |
| Operating System Drives | – |
| Enforce drive encryption type on operating system drives | Enabled |
| Select the encryption type: (Device) | Full Encryption |
| Require additional authentication at startup | Enabled |
| Allow BitLocker without a compatible TPM (requires a password or a startup key on a USB flash drive) | False |
| Configure TPM startup key and PIN: | Do not allow startup key and PIN with TPM |
| Configure TPM startup key: | Do not allow startup key with TPM |
| Configure TPM startup PIN: | Allow startup PIN with TPM |
| Configure TPM startup: | Allow TPM |
| Configure minimum PIN length for startup | Enabled |
| Minimum characters: | 6 |
| Allow enhanced PINs for startup | Enabled |
| Disallow standard users from changing the PIN or password | Disabled (Default) |
| Allow devices compliant with InstantGo or HSTI to opt out of pre-boot PIN. | Disabled (Default) |
| Choose how BitLocker-protected operating system drives can be recovered | Enabled |
| Configure user storage of BitLocker recovery information: | Allow 256-bit recovery key Require 48-digit recovery password |
| Allow data recovery agent | False |
| Configure storage of BitLocker recovery information to AD DS: | Store recovery passwords and key packages |
| Do not enable BitLocker until recovery information is stored to AD DS for operating system drives | False |
| Omit recovery options from the BitLocker setup wizard | False |
| Save BitLocker recovery information to AD DS for operating system drives | False |
| Fixed Data Drives | – |
| Enforce drive encryption type on fixed data drives | Enabled |
| Select the encryption type: (Device) | Full encryption |
| Choose how BitLocker-protected fixed drives can be recovered | Enabled |
| Configure user storage of BitLocker recovery information: | Require 48-digit recovery password |
| Allow data recovery agent | False |
| Configure storage of BitLocker recovery information to AD DS: | Store recovery passwords and key packages |
| Do not enable BitLocker until recovery information is stored to AD DS for operating system drives | False |
| Omit recovery options from the BitLocker setup wizard | False |
| Save BitLocker recovery information to AD DS for operating system drives | False |
| Deny write access to fixed drives not protected by BitLocker | Enabled |
The policy is then assigned to a device group and thus activated. Again, it has proven useful to carry out a test before the rollout.
Automatic Encryption With User PIN
As already indicated, automatic BitLocker activation with Autopilot or Device Preparation lacks one crucial function: a guided PIN setup.
By default, BitLocker starts encryption automatically as soon as the device is set up – no user interaction is required to enter a PIN.
In practice, this leaves two options:
- Foregoing automatic encryption and presenting the user with the standard Windows wizard for BitLocker setup after enrollment.
- Performing encryption automatically and without a PIN during device provisioning.
However, a third option would be ideal: The device is automatically encrypted and the user is provided with a guided interface where they can directly set a PIN.
Microsoft MVP (Most Valuable Professional) Oliver Kieselbach has developed a solution for precisely this scenario. He provides a PowerShell script that can be distributed as an Intune app. After setting up and encrypting a device, this script displays an engaging GUI on the desktop for users to enter their PIN and automatically sets it for BitLocker in the background. A detailed description of the approach can be found in his blog post.
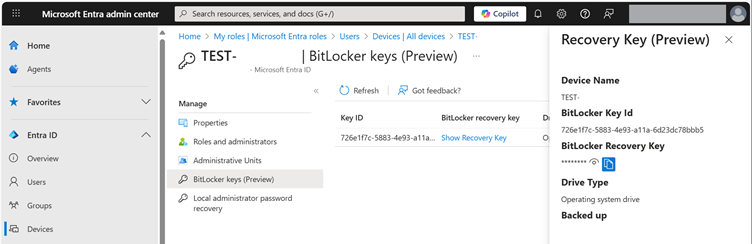
Reading the BitLocker Recovery Key
To access the recovery key, a role with the appropriate permissions is required. In addition to the Global Admin, these roles include (but are not limited to) Cloud Device Admin, Helpdesk Admin, Intune Admin, Security Admin, and Security Reader. The corresponding password can be retrieved in Entra ID and Intune on the device.
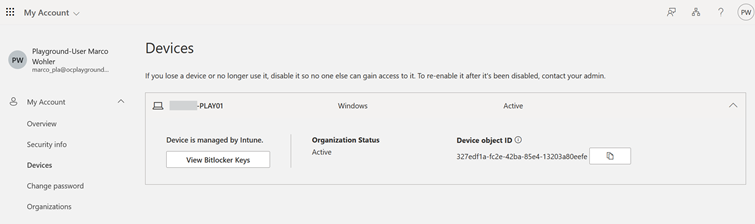
In addition, users can retrieve the recovery keys for their devices under “My Account” (https://myaccount.microsoft.com/device-list) as default. This can be prevented in Entra if the behavior is not desired:
LAPS (Local Admin Password Solution) for Secure Management of Local Administrator Accounts
If you are not currently using an automated solution for setting and changing local administrator account passwords, I strongly recommend using LAPS to manage them.
Every Windows device (with the exception of the domain controller) usually has a local administrator configured, for which the same password is often set throughout the entire company and may not have been changed for years. However, it is recommended to use a strong password that is different for each device and is changed after use or once a certain period of time has elapsed. Ideally, this should be automated to keep the effort to a minimum – and this is exactly where LAPS comes into play.
Activating LAPS in Microsoft Entra ID for Intune
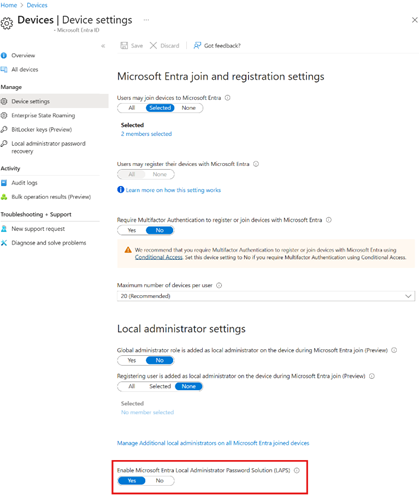
LAPS is already integrated into Windows 11 and does not need to be installed as was previously the case. In order for LAPS to work with Microsoft Entra ID and Intune, it must first be enabled for the tenant in Entra ID. This can be done in the Entra Admin Portal under “Entra ID -> Devices -> Device settings” using the “Enable Microsoft Entra Local Administrator Password Solution (LAPS)” button.
Creating and Assigning the LAPS Policy in Intune
In Intune, a LAPS policy for configuring LAPS on devices can be created under “Endpoint security -> Account protection” using the “Create Policy” button. As with the BitLocker policy, a meaningful name is assigned and then the LAPS settings for configuration are displayed. See below for information about the settings:
| Name | Recommended Value | Description |
| Backup Directory | Backup the password to Azure AD only | Specifies where the LAPS password should be stored (in the local AD or in Entra ID). The managed device must correspond to the selection. Example: A device whose LAPS password is to be backed up to the AD but which is not a member of the domain will implement the policy without error, however, the password will not be backed up. |
| Password Age Days | 30 | Sets the maximum age of a LAPS password. After this period of time, it is automatically rotated. |
| Administrator Account Name | <Name of choice> | Sets the name of the user account to be managed by LAPS. If none is specified, the default account “Administrator” is used. The specified account must exist on the managed device. It is not created automatically. Please note: After completing the Out of Box Experience (OOBE), the “Administrator” account will be automatically deactivated. |
| Password Complexity | Large letters + small letters + numbers + special characters (Default) | Specifies which complexity rules are used when generating LAPS passwords. |
| Password Length | 14 | Sets the length for LAPS passwords. |
| Post Authentication Actions | Reset the password, logoff the managed account, and terminate any remaining processes: upon expiration of the grace period, the managed account password is reset, any interactive logon sessions using the managed account are logged off, and any remaining processes are terminated. | Defines actions that are performed after the LAPS user is used. |
| Post Authentication Reset Delay | 4 | Defines the time in hours before the “Post Authentication Actions” are executed. |
For Windows 11 version 24H2 and higher, additional new LAPS settings can be defined:
| Setting | Recommended Value | Description |
| Automatic Account Management Enabled | The target account will be automatically managed | Enables the new features that work with Windows 11 version 24H2 and later. |
| Automatic Account Management Enable Account | The target account will be enabled | Determines whether the LAPS-managed account should be enabled or disabled. |
| Automatic Account Management Randomize Name | The name of the target account will not use a random numeric suffix. (Default) | Specifies whether the name of the account to be created by LAPS should consist of random number sequences or not. |
| Automatic Account Management Target | Manage a new custom administrator account (Default) | Defines the user account to be managed. A new account that does not yet exist on the managed device and whose name must be specified later can be selected here or the default account “Administrator” can be used. |
| Automatic Account Management Name Or Prefix | <Name of choice> | Sets either the name (if “Automatic Account Management Randomize Name” is disabled) or a prefix (if “Automatic Account Management Randomize Name” is enabled). |
The policy should be assigned to a device group. User groups are also supported but can lead to unexpected behavior if users log in to different devices, resulting in a device receiving different LAPS policies depending on the logged-in user. In general, when using multiple LAPS policies, you should be aware of conflicts that can prevent the settings from being applied to managed devices. In the worst case, conflicts prevent the password from being saved in Entra ID.
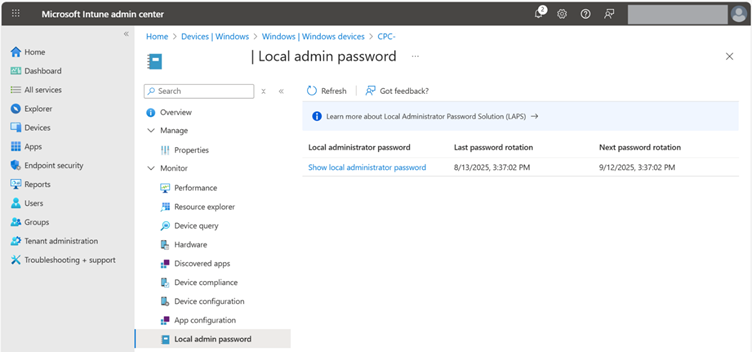
Access to LAPS Passwords in Intune and Entra ID
The LAPS password can then be retrieved in Intune or Entra ID on the device. This requires an appropriately authorized role. In addition to Global Admin, these roles include Intune Admin or Cloud Device Admin, whereby the latter can only retrieve the LAPS password via the Entra portal and not via Intune.
LAPS as Part of a Comprehensive Windows Hardening
LAPS is an indispensable component when it comes to creating a comprehensive hardening baseline. In the past, the product has proven to be robust and can be operated with minimal effort. With the settings described above, local admin accounts are protected and no longer pose an unnecessary risk to the overall system.
Attack Surface Reduction (ASR)
ASR rules identify known attack paths and typical behaviors to prevent malware from being executed or spread within the system. For example, you can specify that Office apps are not allowed to start child processes or that executable content from emails is blocked.
Creating and Configuring an ASR Policy in Intune
The policy is first created in Intune under “Endpoint security -> Attack surface reduction”, then given a suitable name, and finally configured.
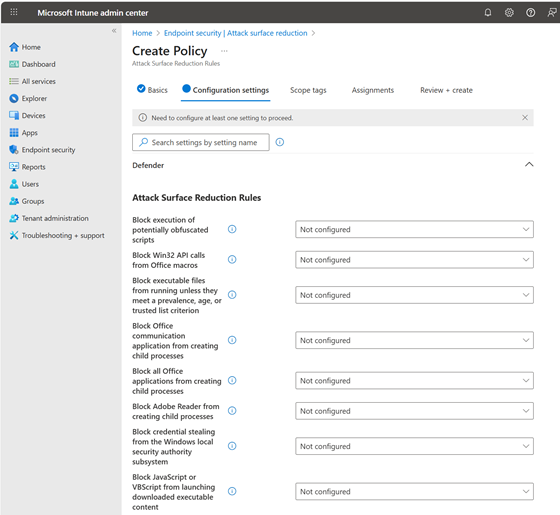
The individual settings should be assessed and configured as restrictively as possible. The aforementioned CIS Benchmark also includes several recommendations on ASR that can be interpreted and implemented in the context of operations.
To avoid any unpleasant surprises, the policy should be tested first. For this purpose, the rollout is often divided into two or three phases. In addition, the individual ASR rules can initially be set to audit mode. The messages generated by ASR are visible in the Defender portal – but only with the appropriate license and activated Defender for Endpoint P2 integration (e.g., via Microsoft 365 E5 or dedicated Defender for Endpoint P2).
With a Microsoft 365 E3 or Microsoft 365 Business Premium license, ASR rules can be configured and rolled out via Intune, however, central telemetry, reports, or alerts are not available in the Security portal.
In this case, events can only be evaluated locally (e.g., via the Windows Event Viewer, see Microsoft’s documentation) or via a connected SIEM. With the Defender for Endpoint integration enabled, ASR events can be found and evaluated via Advanced Hunting in the Defender portal. A query could start as follows, for example:
DeviceEvents
| where ActionType startswith “Asr”
For certain issues, the policy should not be relaxed immediately but rather questioned as to why it should be necessary, for example, to start untrusted and unsigned processes from a USB stick.
ASR Policies and EDR Solutions by Third-Party Providers
Caution is recommended when using third-party EDR solutions. In its documentation on ASR, Microsoft describes the requirements for implementing the rules on the client. Microsoft states:
Microsoft Defender Antivirus must be enabled and configured as primary anti-virus solution, and must be in the following mode:
- Primary antivirus/antimalware solution
- State: Active mode
Microsoft Defender Antivirus must not be in any of the following modes:
- Passive
- Passive Mode with Endpoint detection and response (EDR) in Block Mode
- Limited periodic scanning (LPS)
- Off
This means that when using an EDR solution from another manufacturer, Defender is usually in passive mode or even turned off. Although the attack surface reduction rules can be created in Intune and the policy is delivered to the devices, the rules are not enforced. PowerShell can be used to find out whether Defender is running and in which mode it is:
PS> Get-MpComputerStatus | Select-Object AMServiceEnabled,AntispywareEnabled,AntivirusEnabled,RealTimeProtectionEnabled,AMRunningMode
AMServiceEnabled          : True
AntispywareEnabled        : True
AntivirusEnabled          : True
RealTimeProtectionEnabled : False
AMRunningMode             : Passive Mode
Using the Windows Firewall Effectively
The Windows firewall is another feature that is essential for a hardening baseline for Windows clients. It blocks unwanted incoming connections, especially on mobile devices, thereby reducing the attack surface as nothing on client systems should be accessible from the outside.
In my article Configuring a Protective Windows Firewall, I describe how the Windows firewall can be quickly, easily, and securely configured and distributed in domains using GPO. Building on this, I have described on my private blog how the same baseline can be created and rolled out using Intune – including exports to JSON for even faster results.
In another article, I described what tips to keep in mind during creation and what the configurable values mean exactly:
- Baseline creation (in German language only)
- Tips & tricks (in German language only)
Conclusion: Greater IT Security With Windows 11 Hardening
The methods and recommendations described above can be used to create solid security baselines for Windows 11 devices managed by Intune. As with all system hardening measures, thorough testing prior to rollout and careful documentation are crucial for the success and acceptance of “security” in the company.
Some elements, such as Microsoft Security Baselines or LAPS, can be implemented with relatively little effort and still significantly increase security. The recommendations and values provided for BitLocker and LAPS settings make it even easier to get started. However, it is important to always take into account the respective Windows version and the specific scenario to which the settings apply.
These steps lay the foundation for robust Windows 11 hardening, which significantly reduces the risk of attacks while offering tangible added value for your company’s IT security.
Good luck with hardening!